2016년 12월 25일 일요일

[C#] collection, Array

IEnumerable : 최소한의 기능성 (열거) 만 제공. Movenext로 값 찾는다. 인덱스로 못찾음.

ICollection : 중간정도 기능성 . 카운트같은것.

IList / IDictionary : 최대의 기능성 . 색인 키에 의한 임의접근도 가능 

IEnumerable - Movenext, foreach의 기능이 있다 .

ICollection - IEnumerable과 같이 foreach로 항목을 훑는기능에 count, Contain, ToArray 기능 + 쓰기 가능한것에는 Add,Remove,clear 기능이 있다. 

IList - 특정 위치의 요소에 접근하는 기능이 있다.


** ArrayList 는 List 보다 느리다. (T가 값형식 일때)
// Array //
Array 는 크기는 변경이 안된다. 하지만 색인으로 특정 요소에 접근하는 속도는 매우 빠르다.

참조 형식이라 딥카피를 해야한다. (Array1 = Array2.Clone() 이건 shallow copy다 )

열거 - Array.ForEach(new[] {1,2,3} , console.WriteLine);
BitArray - bool 값만 저장하므로, 메모리사용이 적다. 0

하드디스크 타입별 최대 파일 용량 크기

  • NTFS: 16 TiB - 64 KiB
  • Ext4: 16 TBs
  • FAT32: 4GB - 1

2016년 12월 22일 목요일

[python] matplotlib setting

backend 를 다음에서 정할 수 있다 . 경로는

C:\Anaconda2\Lib\site-packages\matplotlib\mpl-data\matplotlibrc

# The default backend; one of GTK GTKAgg GTKCairo GTK3Agg GTK3Cairo
# CocoaAgg MacOSX Qt4Agg Qt5Agg TkAgg WX WXAgg Agg Cairo GDK PS PDF SVG
# Template.
# You can also deploy your own backend outside of matplotlib by
# referring to the module name (which must be in the PYTHONPATH) as
# 'module://my_backend'.
backend      : WXAgg <

# If you are using the Qt4Agg backend, you can choose here
# to use the PyQt4 bindings or the newer PySide bindings to
# the underlying Qt4 toolkit.
backend.qt4 : PyQt4 <

2016년 12월 19일 월요일

[python] Theano Givens

from theano import function
from theano import tensor as T
from theano import shared

state = shared(0)
inc = T.iscalar()
accumulator = function([inc],state,updates=[(state,state+inc)])
decrementor = function([inc],state,updates=[(state,state-inc)])

fn_of_state = state*2+inc
foo = T.scalar(dtype=state.dtype)
skip_shared = function([inc,foo],fn_of_state,givens=[(state,foo)])

print state.get_value()
print skip_shared(1,3)

----------------------------------------------------------------------
givens=[(state,foo)]은 state를 foo로 대체해준다.

따라서, inc =1 , foo= 3 이였고, given으로 state를 foo즉 3으로 바꿔서 fn_of_state가 계산된다.

그리고 원래의 state는 바뀌지 안는다.

이 givens는 shared valuable뿐만 아니라, 모든 심볼릭 변수들을 대체할 수 있다.

[Python] Theano Shared Variable and update

from theano import function
from theano import tensor as T
from theano import shared

state = shared(0)
inc = T.iscalar()
accumulator = function([inc],state,update=[(state,state+inc)])

---------------------------------------------------------------------------
여기서 이 shared value 는 전역 변수라고 생각하면 된다.

이 변수를 사용하는 모든 함수는 이 값을 공유하게 된다.

이 값은 접근을 아래와 같이 한다.

The value can be accessed and modified by the .get_value() and .set_value() method

---------------------------------------------------------------------------
여기서 update 는 어떤 형태(form)의 페어에 적용이 된다.

즉,  state.value 를 state_inc로 바꾼다 라는 의미가 된다.


===============================================
이 코드의 의미를 살펴보자.
state 는 shared  변수
inc는 일반적인 변수이다.

accumulator 는 input 으로 inc변수 (iscalar) 를 가지고, output으로는 stsate 를 내보낸다.
그리고 이 함수는 state를 state+inc로 바꾸는 동작을 가진 함수이다.

따라서 accumulator(K) 를 실행하면,output으로 stsate를 출력후  state 를 stsate_inc로 바꾼다.


**  update 를 쓰는 이유.
1.가끔 더 속도가 빠름.
2. 언제 업데이트 되는지 추적을 편하게 하기 위해.
3. shared variable를 사용을 안하는데, 업데이트는 해야될떄

2016년 12월 5일 월요일

[c#] Function Factory 예제


스트림 바이트별로 읽는 함수

------

public Dictionary> ReaderDict( Stream stream )
        {
            Dictionary < string, Func > output = new Dictionary>();

            Func readbytearr =  input  =>
            {
                stream.Read(input,0,input.Length);
                return input;
            };

            Func ToByte     = () => (byte)stream.ReadByte();
            Func ToInt      = () => BitConverter.ToInt32 ( readbytearr(new byte[4]),0 );
            Func ToLong     = () => BitConverter.ToInt64 ( readbytearr(new byte[8]),0 );
            Func ToFloat    = () => BitConverter.ToSingle( readbytearr(new byte[4]),0 );

            byte[] tempman = new byte[2];

            output.Add( "byte" , ToByte );
            output.Add( "int" , ToInt );
            output.Add( "long" , ToLong );
            output.Add( "float" , ToFloat );

            return output;
        }

-------

읽는 예제가 (reader 는 위의 읽는 딕셔너리 이름)
for ( int i = 0 ; i < 3 ; i++ )
            {
                Console.WriteLine( "X"           +"="+ reader["int"]() );
                Console.WriteLine( "Y"           +"="+ reader["int"]() );
                Console.WriteLine( "ByteOffset"  +"="+ reader["long"]() );
                Console.WriteLine( "Length"      +"="+ reader["int"]());
                Console.WriteLine( "Width"       +"="+ reader["int"]());
                Console.WriteLine( "Height"      +"="+ reader["int"]() );
                Console.WriteLine( "RealX"       +"="+ reader["float"]());
                Console.WriteLine( "RealY"       +"="+ reader["float"]());
                Console.WriteLine( "RealW"       +"="+ reader["float"]());
                Console.WriteLine( "RealH"       +"="+ reader["float"]() );
                Console.ReadLine();
            }

2016년 11월 23일 수요일

[C# LnaguageExt] Curry and fun Example

using lx = LanguageExt;
using  static LanguageExt.Prelude;

namespace ConsoleApplication2
{
    class Program
    {

        static void Main( string[] args )
        {
            Func temp = (a,b,c,d) =>
            {
                return a+b+c+d;
            };

            var add12 = curry( temp )( 1 )( 2 ); // using  static LanguageExt.Prelude; 으로 curry 바로 접근
            Console.WriteLine( add12( 5 )(5) );
           
            var temp4 = fun( (int x,int y) => Console.WriteLine(3) ); // using  static LanguageExt.Prelude; 으로 fun바로 접근
            var temp4_1 = curry(temp4)(3); // lx.Unit 은 위의 temp4 의 리턴타입
            var temp5 = (Action)(()=>Console.Write(3));
            Console.ReadLine();
        }
    }

2016년 11월 22일 화요일

[opencv python] cv2.imread cv2.imshow

def get_im_cv2(path):
    img = cv2.imread(path,1)
    resized = cv2.resize(img, (32, 32), cv2.INTER_LINEAR)
    #cv2.startWindowThread("preview")
    cv2.imshow("preview", resized)
    key = cv2.waitKey(0)
    if key == ord('t'):
        cv2.destroyWindow("preview")
 
    return resized


or


def get_im_cv2(path):
    img = cv2.imread(path,1)
    resized = cv2.resize(img, (32, 32), cv2.INTER_LINEAR)
    #cv2.startWindowThread("preview")
    cv2.imshow("preview", resized)
    cv2.waitKey(0)
 
    return resized


waitKey 는 반드시 써줘야 이미지가 나온다.

[c#] File Stream Example

File Stream


-------------------
static void Main( string[] args )
        {

            Console.WriteLine( "hellow" );
            Stream s = new FileStream( "test.txt" , FileMode.Create );

            Console.WriteLine( s.CanRead );
            Console.WriteLine( s.CanWrite );
            Console.WriteLine( s.CanSeek );

            int temp = 6;
            byte[] temp2 = BitConverter.GetBytes(temp);

            Console.WriteLine( "temp2 length  :" + temp2.Length.ToString() );

            s.Write( temp2 , 0 , temp2.Length );
            s.WriteByte( 102 );
            byte[] block = { 1,2,3,4,5,};
            s.Write( block , 0 , block.Length );

            Console.WriteLine( s.Length );
            Console.WriteLine( s.Position );
            s.Position = 0;

            Console.WriteLine( "ReadByte1 : " + s.ReadByte() );
            Console.WriteLine( "ReadByte2 : " + s.ReadByte() );

            Console.WriteLine( s.Read( block , 0 , block.Length ) );
            s.Close();
            Console.ReadLine();
        }

-----------------

[opencv] Filter

Median : cv2.medianBlur(originimg,5) -> 2번쨰는 필터 크기

Biliteral : cv2.bilateralFilter(originimg,5(d),sigma color,sigma Space)

d -> 필터크기. 보통5정도 사용. -1 시 sigma space에의해 자동으로 계산됨
sigma color -> 컬러공간에서 필터표준편차  값이 크면 멀리 떨어진 색상을 혼합하여 유사한 색상으로 뭉개서 큰영역으로 만든다.
sigma space -> 좌표공간에서 필터 표준편차이다. 값이 크면 sigma color 에 의해 색상이 충분히 가까우면서 위치가 멀리 떨어진 이웃화소가 영향을 준다

2016년 11월 21일 월요일

[opencv] threshold

ret,thresh2 = cv2.threshold(img,50,255,cv2.THRESH_BINARY_INV)

threshold (소스 , 임계치, 최대값(Max), 출력 종륲 (dst라고한다.))

- dst 는

Binary = 임계치보다 크면 Max치 / 작으면 0
Trunc= 임계치보다 크면 Max치 / 작으면 소스
Tozero= 임계치보다 크면 소스  / 작으면 0


---------------------------------------
meanthimg = cv2.adaptiveThreshold(img,255,cv2.ADAPTIVE_THRESH_MEAN_C,\
    cv2.THRESH_BINARY,17, 0)


마지막 인수는 parameter1 인데 이것은 blovksize 17에서 구한 임계치 - paramete1 으로 임계치가 결정된다.

2016년 11월 15일 화요일

[C#] Closure Example

class Program
    {
        static void Main( string[] args )
        {
            myFunc(1)(2)(3);
            var partial = myFunc(4)(4);
            var sum1 = partial(1);
            var sum2 = partial(2);
            var sum3 = partial(3);
            var sum4 = partial(4);
        }

        static Func& myFunc( int x ) => ( y ) => ( z ) => x + y + z;
    }

[C#] Closure Example

class Program
    {
        static void Main( string[] args )
        {
            myFunc(1)(2)(3);
            var partial = myFunc(4)(4);
            var sum1 = partial(1);
            var sum2 = partial(2);
            var sum3 = partial(3);
            var sum4 = partial(4);
        }

        static Func> myFunc( int x ) => ( y ) => ( z ) => x + y + z;
    }

2016년 11월 9일 수요일

[C#] Currying

method ( par1, par2, par3) => return result


Currymethod(par1, curmethod2(par2 , method3(par3))) => return result

이렇게 input 파라미터를 1개만 받도록 나누는 것이다.

이러면 각각의 함수 method1,method2,method3 의 재사용이 가능해진다.

[c#] Closure Example2

static void Closures( ) {
Console.WriteLine(GetClosureFunction( )(30));
}

static Func GetClosureFunction( ) {
  int val = 10;
  Func internalAdd = x = > x + val;
    return internalAdd;
}


-------------

Console.WriteLine(GetClosureFunction( )(30)); 이부분을 보자.

GetClosureFunction( )(30)은

GetClosureFunction( )로 메소드는 끝이 나고,

Func internalAdd = x = > x + val; 을 리턴한다.

이때 이 internalAdd  는 메소드 안의 val 을 참조하기 때문에, 메소드가 끝났는데도, 이 메소드 안 val 가 살아 있는것이다.

Advantage of Closure

변수를 보호 할 수 있다.

즉, 클래스의 필드 멤버가 클래스의 함수에 쓰인다고 하자.

이 필드 멤버는 함수가 실행되기 전부터 초기화되고, 값이 지정된다.

그렇기 때문에, 중간에 이 값이 바뀌거나 했을경우 추적하기가 힘들어 진다.

즉, 디버깅이 복잡해 지게 된다.

어디서 이 필드멤버가 바뀌었는지 등등 고려해야될게 많아 진단 말이다.

따라서, 함수가 실행되고, 이 함수가 완전히 끝날떄까지만 지속되는 변수라면,

디버깅시, 이 함수에서 쓰이는 어던 수 (아까 예의 필드 멤버)는 함수 안에 로컬 변수로 있기 때문에, 디버깅이 매우 쉬워 진다.

이 테크닉을 클로저 라고 한다.

[C#] Closer Example

List list = new List();
            for ( int i = 0 ; i < 10 ; i++ )
            {
                list.Add( () => Console.WriteLine( i ) );
            }

list.ForEach(p=> p());


2016년 11월 7일 월요일

[Git] Basic step2

add file or edit file and..


1. git status : show what is changed in your repository

2. git add filename

3. git commit -m "message"

3. git push


[Git] Git basic - step1

1. install git

2.run gitbash

3. write down these

=> git config --global user.name ""


=> git config --global user.email ""

2016년 10월 17일 월요일

2016년 10월 11일 화요일

2016년 10월 5일 수요일

c# wpf Create Random Number of Grid and Image Load Drop in grid cell

Main code

-------------------------------------------------------
    public partial class MainWindow : Window
    {
        List EvtList;
        public MainWindow()
        {
            EvtList = new List();
            InitializeComponent();

            for (int i = 0; i < 2; i++)
            {
                for (int j = 0; j < 2; j++)
                {
                   
                    StackPanel stp = new StackPanel();
                    stp.Width = 80;
                    stp.Height = 80;
                    stp.AllowDrop = true;
                    stp.Background = Brushes.Transparent; // Here is very Important
                    Grid.SetColumn(stp, j);
                    Grid.SetRow(stp, i);

                    Image imgbox = new Image();
                    imgbox.Width = 80;
                    imgbox.Height = 80;
                    stp.Children.Add(imgbox);

                    EventClass evc = new EventClass(stp, lbl,imgbox, i, j);
                    EvtList.Add(evc);
                    stp.Drop += evc.DropEventMethod;

                    gridmain.Children.Add(stp);

                }
            }


        }
-------------------------------------------------------


Class Code
-------------------------------------------------------
    public class EventClass
    {
        public StackPanel Btn;
        public Label Lbl;
        public Image Img;
        public int Rownum;
        public int Colnum;

        public EventClass(StackPanel btn, Label lbl , Image img,int row,int col)
        {
            Btn = btn;
            Rownum = row;
            Colnum = col;
            Lbl = lbl;
            Img = img;
        }

        public void DropEventMethod(object ss, DragEventArgs ee)
        {
            this.Lbl.Dispatcher.BeginInvoke((Action)(() => Lbl.Content =  $"Click i = {this.Rownum}  j = {this.Colnum}"  ));
            string[] files = (string[])ee.Data.GetData(DataFormats.FileDrop);
            Lbl.Content = files[0];
            Img.Source = new BitmapImage(new Uri(files[0]));
        }
       

    }
-------------------------------------------------------


Xaml Code
-------------------------------------------------------
        xmlns="http://schemas.microsoft.com/winfx/2006/xaml/presentation"
        xmlns:x="http://schemas.microsoft.com/winfx/2006/xaml"
        xmlns:d="http://schemas.microsoft.com/expression/blend/2008"
        xmlns:mc="http://schemas.openxmlformats.org/markup-compatibility/2006"
        xmlns:local="clr-namespace:WpfApplication1"
        mc:Ignorable="d"
        Title="MainWindow" Height="350" Width="525">


-------------------------------------------------------

c# WPF Create Event and Subscribe with for implement

First, Create Event Class

---------------------------------------
public class EventClass
    {
        public Button Btn;
        public Label Lbl;
        public int Rownum;
        public int Colnum;

        public EventClass(Button btn, Label lbl ,int row,int col)
        {
            Btn = btn;
            Rownum = row;
            Colnum = col;
            Lbl = lbl;
        }

        public void ClickEventMethod(object ss, RoutedEventArgs ee)
        {
            this.Lbl.Dispatcher.BeginInvoke((Action)(() => Lbl.Content =  {"Click i = {this.Rownum}  j = {this.Colnum}"  ));
            Console.WriteLine($"Click i = {this.Rownum}  j = {this.Colnum}");
        }


    }

---------------------------------------


Here is main Code

-------------------------------------
public partial class MainWindow : Window
    {
        List EvtList;
        public MainWindow()
        {
            EvtList = new List();
            InitializeComponent();

            for (int i = 0; i < 2; i++)
            {
                for (int j = 0; j < 2; j++)
                {
                   
                    Button btn = new Button();
                    btn.Width = 80;
                    btn.Height = 80;
                    Grid.SetColumn(btn, j);
                    Grid.SetRow(btn, i);


                    EventClass evc = new EventClass(btn, lbl, i, j);
                    EvtList.Add(evc);
                    btn.Click += evc.ClickEventMethod;

                    gridmain.Children.Add(btn);

                }
            }
        }
    }

-------------------------------------


Here is Xaml

-------------------------------------
        xmlns="http://schemas.microsoft.com/winfx/2006/xaml/presentation"
        xmlns:x="http://schemas.microsoft.com/winfx/2006/xaml"
        xmlns:d="http://schemas.microsoft.com/expression/blend/2008"
        xmlns:mc="http://schemas.openxmlformats.org/markup-compatibility/2006"
        xmlns:local="clr-namespace:WpfApplication1"
        mc:Ignorable="d"
        Title="MainWindow" Height="350" Width="525">


-------------------------------------

2016년 9월 27일 화요일

c# Bitmap Size Limits

  • The max is object size is 2GB : 2,147,483,648
  • Default bitmap is 32bpp (4 bytes), the largest area we can have is 2GB / 4 = 536,870,912
  • If we want a square, the largest we can get is sqrt(2GB/4) = 23,170

따라서 

2바이트 = 16bpp(bit per pixel)

1바이트 = 8bpp

0.5바이트 = 4bpp

등으로 픽셀당 비트수를 낮추면 좀더 큰 Array 의 비트맵을 만들 수 있다. 

2016년 9월 26일 월요일

2016년 9월 21일 수요일

c# Get All Enum Value

1. Enum Value
        public enum eRangeI { AUTO, OFF, R1uA, R10uA, R100uA, R1mA, R10mA, R100mA, R1A }
        static void Main(string[] args)
        {
           
            foreach (var item in Enum.GetValues(typeof(eRangeI)))
            {
                Console.WriteLine($"{item}");

            }
            Console.Read();
        }

2.Enum index

        public enum eRangeI { AUTO, OFF, R1uA, R10uA, R100uA, R1mA, R10mA, R100mA, R1A }
        static void Main(string[] args)
        {
           
            foreach (var item in Enum.GetValues(typeof(eRangeI)))
            {
                int value = (int)item;
                Console.WriteLine($"{value}");

            }
            Console.Read();
        }

c# Get Enum Value by index

public enum eRangeI { AUTO, OFF, R1uA, R10uA, R100uA, R1mA, R10mA, R100mA, R1A }
        static void Main(string[] args)
        {

            eRangeI value = (eRangeI)0;
            Console.WriteLine(value.ToString());
            Console.Read();
        }


--- output = AUTO

C# winform All Enum insert in comboBox

cmbSrcRange.DataSource = Enum.GetValues(typeof(eRangeI));

python for 문 사용시 주의해야할 점

--- 잘못된 예  (i는 0부터 시작한다.  밑줄 부분은 1부터 시작해야 한다.)
def Michalewicz(self,dim,x,m):
        sum = 0
        for i in range(dim):
            new = np.sin(x[i]) * ((np.sin(i*(x[i]**2) / np.pi))**2*m)
            sum  = sum + new
        return -1 * sum


----- 잘된 예 ( i + 1 로 했다.)
def Michalewicz(self,dim,x,m):
        sum = 0
        for i in range(dim):
            new = np.sin(x[i]) * ((np.sin((i+1)*(x[i]**2) / np.pi))**2*m)
            sum  = sum + new
        return -1 * sum

이런거 잘 보자. 이것때메 엄청 삽질했다.

2016년 9월 20일 화요일

C# Image to byte[]

Image 가 가로 4 세로 2 이고

1 2 3 4
5 6 7 8 을 array 로 바꾸면


1 5 2 6 3 7 4 8 의 배열이 생긴다.

이걸 다시 Reshape(4,2) -> Transpose 하면

원래대로 돌아온다.

1 = 0,0

5 = 0,1

2 = 1,0

6 = 1,1

에서
1 = 0,0

5 = 1,0

2 = 0,1

6 = 1,1
.
.
.
.

c# Accord ReShape

arr1 = [1 2 3 4 5 6]
arr2 = [1 2 3 4 5 6]

Array = Concatenate(arr1,arr2) =  [1 2 3 4 5 6 1 2 3 4 5 6 ]

Reshape(Array,6,2)
=
[1 2
3 4
5 6
1 2
3 4
5 6]


2016년 9월 18일 일요일

c# Image to grayscale byte array

http://stackoverflow.com/questions/18766004/how-to-convert-from-system-drawing-bitmap-to-grayscale-then-to-array-of-doubles

----------------------------------------------------------------------

        public static byte[,] ToGrayscale(Bitmap bitmap)
        {
            var result = new byte[bitmap.Width, bitmap.Height];
            for (int x = 0; x < bitmap.Width; x++)
                for (int y = 0; y < bitmap.Height; y++)
                {
                    var grayColor = ToGrayscaleColor(bitmap.GetPixel(x, y));
                    result[x, y] = (byte)grayColor;
                }
            return result;
        }

        public static byte ToGrayscaleColor(Color color)
        {
            var level = (byte)((color.R + color.G + color.B) / 3);
            return level;
        }

2016년 8월 30일 화요일

c# asnyc await example Simple notation


private void button1_Click(object sender, EventArgs e)
{
Console.WriteLine("in ");
method1();

//Thread.Sleep(1000);
Console.WriteLine( "out");

}

async void method1()
{
Console.WriteLine("in method1");
await Task.Run(() => awmethod() );
Console.WriteLine("out method1");
}

void awmethod()
{
Thread.Sleep(3000);
Console.WriteLine("Here Here");
}

----------------------


private void button1_Click(object sender, EventArgs e)
{
Console.WriteLine("in ");
method1();

//Thread.Sleep(1000);
Console.WriteLine( "out");

}

async void method1()
{
Console.WriteLine("in method1");
await getmethod();
Console.WriteLine("out method1");
}

void awmethod()
{
Thread.Sleep(3000);
Console.WriteLine("Here Here");
}

Task getmethod()
{
Task task = Task.Run(() => awmethod());
return task;
}

----------------------


private void button1_Click(object sender, EventArgs e)
{
Console.WriteLine("in ");
method1();

//Thread.Sleep(1000);
Console.WriteLine( "out");

}

async void method1()
{
Console.WriteLine("in method1");
await getmethod();
Console.WriteLine("out method1");
}

void awmethod()
{
Thread.Sleep(3000);
Console.WriteLine("Here Here");
}

Task getmethod()
{
Task task = new Task(() => awmethod());
task.Start();

return task;
}

c# await 로 비동기 Example

public async void TempSaveGrabData(byte[] inputArr, int buffNum, int scanNum)
{
await TempSaveMethodTask(inputArr,buffNum,scanNum);
Console.WriteLine( "{0} Scan and {1} Buff is Save in C:", scanNum,buffNum);
}

public Task TempSaveMethodTask(byte[] inputArr, int buffNum, int scanNum)
{
Task tempSaveTask = new Task(() => TempSaveMethod(inputArr, buffNum, scanNum));
return tempSaveTask;
}

void TempSaveMethod(byte[] inputArr, int buffNum, int scanNum)
{
string path = "c:\\ImageTemp\\" + scanNum.ToString("D3") + "_" + buffNum.ToString("D3") + ".dat";
Stream outStream = new FileStream(path, FileMode.Create);
outStream.Write(inputArr, 0, inputArr.Length);
outStream.Dispose();
}


여기선 데이터를 받으면 데이터를 하드에 저장을 하는데, 이 저장을 하는 작업을 하는동안 메인 쓰레드가 안멈추길 바란다.
await 로 쓰는동안 제어권을 호출한 메소드에 다시 넘겨준다.

c# Task async await example 2

private async void button1_Click(object sender, EventArgs e)
{

int result = await inttask();
label1.Text = result.ToString();
}

public async Task inttask()
{
Task temptak = new Task(method);
temptak.Start();
int output = await temptak;
return output;
}

int method()
{
Thread.Sleep(4000);
return 999;
}


4초동안 계산을 하는데, 윈폼은 활성화 되있는 상대고, 계산이 끝나면 라벨에 결과가 표시가 된다.

-> 다음은 마우스 클릭 이벤트를 계산이 끝나기 전에 눌렀을떄 어떻게 되나 보자.

private async void button1_Click(object sender, EventArgs e)
{
Console.WriteLine("event out");
int result = await inttask();
label1.Text = result.ToString();
Console.WriteLine("Txt change");
}

public async Task inttask()
{
Task temptak = new Task(method);
temptak.Start();
int output = await temptak;
return output;
}

int ttt = 100;
int method()
{
ttt = ttt * 2;
Thread.Sleep(4000);
return ttt;
}

보면 큐에 쌓인다.

5번 누르면 5번 결과가 바뀐다. 하지만 누른 시간차만큼 바뀌는데 시간이 걸림.

c# Task Async Await Basic Example


private void button1_Click(object sender, EventArgs e)
{
Mymethodasync();
}

public async Task Mymethodasync()
{
Console.WriteLine("1");
Task llrr = longrun();
Console.WriteLine("2");
int output = await llrr;
Console.WriteLine("3");

}

public async Task longrun()
{
Console.WriteLine("longrun Task");
await Task.Delay(1000);
Console.WriteLine("longrun Task Done");
return 1;
}

2016년 8월 23일 화요일

c# Event

http://mrw0119.tistory.com/21

좋은 설명

C# 여러개의 매소드를 순차적으로 실행할때


만약 각 매소드들의 매개변수가 같으면 델리게이트 체인을 이용한다.

EX)

public class testclass
{
public delegate int calc(int a, int b); // 델리게이트 선언 (클래스와같은 형선언, 단지 매개변수만 형태 지정이 가능하다.)

public int chain()
{
calc deleInstance = new calc(method1); // 단순히 델리게이트지정

calc chaindele = (calc)Delegate.Combine(new calc(method2),new calc(method3)); // 델리게이트 체인 지정으로 매소드2,3 이 순차적으로 실행된다.

int output = caindele(20,10);

}


public int method1(int input, int input2)
{
int output = input + input2;
return output;
}

public int method2(int input, int input2)
{
int output = input * input2;
return output;
}
public int method3(int input, int input2)
{
int output = input - input2;
return output;
}


}

c# Assertion

http://illef.tistory.com/entry/Beyond-the-Assertion-Code-Contract-1

C# Pointer


http://hbesthee.tistory.com/1163


Ex :

public byte[] DataTransFromBuffer(SapBuffer buff)
{
try
{
byte[] output = new byte[buff.Width * buff.Height];
GCHandle pinnedArray = GCHandle.Alloc(output, GCHandleType.Pinned); // make
IntPtr pointer = pinnedArray.AddrOfPinnedObject();
buff.ReadRect(0, 0, buff.Width, buff.Height, pointer);
Marshal.Copy(pointer, output, 0, output.Length);
pinnedArray.Free();
return output;
}
catch (Exception ex)
{
MessageBox.Show(ex.ToString());
return null;
}
}

2016년 8월 10일 수요일

C# 레지스트리에 설정파일 저장 변경 로드 테스트

먼저 Regedit 에서

HKEY_CURRENT_USER\SOFTWARE\ZTest 로 키를 생성

(키 생성하면 폴더가 생성됨)

안에 DogName 와 Age 를 스트링으로 생성한다.


void Load()
{
String Keypath = "Software\\ZTest";
RegistryKey regkey = Registry.CurrentUser.OpenSubKey(Keypath);
if (regkey != null)
{
Path = regkey.Name;
item1 = (string)regkey.GetValue("DogName");
item2 = (string)regkey.GetValue("Age");
}
}


void Save()
{
String Keypath = "Software\\ZTest";
RegistryKey regkey = Registry.CurrentUser.OpenSubKey(Keypath);
if (regkey != null)
{
Path = regkey.Name;
regkey.SetValue("DogName","Not mimi");
regkey.SetValue("Age","not 12");
}
}

2016년 8월 4일 목요일

C# for loop with no int i

Decimal.Round() -> decimal point 2


string 보너스

doublet = 10234.234;
Console.WriteLine(t.ToString("#,#.###"));


소수점에 대한 글

http://www.mkexdev.net/Article/Content.aspx?parentCategoryID=2&categoryID=9&ID=98

2016년 8월 3일 수요일

c# PictureBox Real Position on Not Scaled Image

Point controlRelative = pictureBox1.PointToClient(MousePosition);
Size imageSize = pictureBox1.Image.Size;
Size boxSize = pictureBox1.Size;

Point imagePosition = new Point((imageSize.Width / boxSize.Width) * controlRelative.X,
(imageSize.Height / boxSize.Height) * controlRelative.Y);

2016년 8월 2일 화요일

c# Task Func Return Value Net4.5 Style


NET 4.5

The recommended way in .NET 4.5 is to use Task.FromResult, Task.Run or Task.Factory.StartNew:

--FromResult:

public async Task DoWork()
{
int res = await Task.FromResult(GetSum(4, 5));
}

private int GetSum(int a, int b)
{
return a + b;
}


Please check out Stefan’s comments on the usage of FromResult in the comments section below the post.

--Task.Run:


public async Task DoWork()
{
Func function = new Func(() => GetSum(4, 5));
int res = await Task.Run(function);
}

private int GetSum(int a, int b)
{
return a + b;
}


--Task.Factory.StartNew:


public async Task DoWork()
{
Func function = new Func(() => GetSum(4, 5));
int res = await Task.Factory.StartNew(function);
}

private int GetSum(int a, int b)
{
return a + b;
}


=========================== My Code ===================
Action actone;
Func funcone;
Action acttwo;


private async void pictureBox1_MouseClick(object sender, MouseEventArgs e)
{
int posX = e.X;
int posY = e.Y;

actone = ActMethod;
funcone = ActMethod3;
acttwo = ActMethod2;

await Task.Factory.StartNew(() => actone());
await Task.Factory.StartNew(actone);
await Task.Factory.StartNew(() => acttwo(posX, posY));

string reu = await Task.FromResult(funcone(posX, posY));

string result = await Task.Run(() => funcone(posX, posY));
}

void ActMethod()
{
Console.WriteLine("done");
}

void ActMethod2(int posX, int posY)
{
Console.WriteLine("done");
}

string ActMethod3(int posX, int posY)
{
Console.WriteLine("done");
return "func done";
}

c# 비동기 Task.Factory.StartNew 사용

1. 메소드 만듬

2. 매소드를 가지고 Action 만듬

3. 테스크에 Action 집어넌다.

= 이건 Method 에 Input Parameter 가 있을때

Action acttwo;

private void pictureBox1_MouseClick(object sender, MouseEventArgs e)
{
int posX = e.X;
int posY = e.Y;


acttwo = ActMethod2;
Task.Factory.StartNew(() => acttwo(posX,posY));
}

void ActMethod2(int posX, int posY)
{
Color inten = bitmp.GetPixel(posX, posY);
byte bt1 = inten.B;
for (int i = posX; i < posX + 200; i++) { linelist.Add(bitmp.GetPixel(i, posY).R); } Console.WriteLine("done"); } = 이건 Input Parameter 가 없을때 Action actone; private void pictureBox1_MouseClick(object sender, MouseEventArgs e) { int posX = e.X; int posY = e.Y; actone = ActMethod; Task.Factory.StartNew(actone); // 이거나 Task.Factory.StartNew(() => actone()); // 이거 쓴다
}

void ActMethod()
{

Console.WriteLine("done");
}

Fast Method of Bitmap To GrayScale


public static Bitmap MakeGrayscale3(Bitmap original)
{
//create a blank bitmap the same size as original
Bitmap newBitmap = new Bitmap(original.Width, original.Height);

//get a graphics object from the new image
Graphics g = Graphics.FromImage(newBitmap);

//create the grayscale ColorMatrix
ColorMatrix colorMatrix = new ColorMatrix(
new float[][]
{
new float[] {.3f, .3f, .3f, 0, 0},
new float[] {.59f, .59f, .59f, 0, 0},
new float[] {.11f, .11f, .11f, 0, 0},
new float[] {0, 0, 0, 1, 0},
new float[] {0, 0, 0, 0, 1}
});

//create some image attributes
ImageAttributes attributes = new ImageAttributes();

//set the color matrix attribute
attributes.SetColorMatrix(colorMatrix);

//draw the original image on the new image
//using the grayscale color matrix
g.DrawImage(original, new Rectangle(0, 0, original.Width, original.Height),
0, 0, original.Width, original.Height, GraphicsUnit.Pixel, attributes);

//dispose the Graphics object
g.Dispose();
return newBitmap;
}

c# Wait 관련

1. 테스크를 병렬로 사용한다
Task.WaitAll(
Task.Factory.StartNew(()=>DoSomething()),
Task.Factory.StartNew(()=>Thread.Sleep(200))
);

2.스톱워치 사용 : 매우 정확함. 스톱워치 시작, 작업, 대기 ->
private void Wait(double milliseconds)
{
long initialTick = stopwatch.ElapsedTicks;
long initialElapsed = stopwatch.ElapsedMilliseconds;
double desiredTicks = milliseconds / 1000.0 * Stopwatch.Frequency;
double finalTick = initialTick + desiredTicks;
while (stopwatch.ElapsedTicks < finalTick)
{

}
}

private void btnRight_Click(object sender, RoutedEventArgs e)
{
currentPulseWidth = 0;

//The stopwatch will be used to precisely time calls to pulse the motor.
stopwatch = Stopwatch.StartNew();

GpioController controller = GpioController.GetDefault();

servoPin = controller.OpenPin(13);
servoPin.SetDriveMode(GpioPinDriveMode.Output);


// Here is how you would move the motor. Call a funciton like this when ever you are ready to move motor
MoveMotor(ForwardPulseWidth);

Wait(3000); //wait three seconds

//move it backwards
MoveMotor(BackwardPulseWidth);

}

2016년 7월 27일 수요일

c# winform - acess controller in sub thread BeginInvoke((Action)(() => ControllerAcess ));


btnScan => Main Thread

메인스레드가 아닌곳에서 접근할려면 이렇게 하면 된다.

btnScan.BeginInvoke((Action)(() => btnScan.Enabled = true));


예를 들어

Thread tr;
private void button2_Click(object sender, EventArgs e)
{
tr = new Thread(method);
tr.Start();
}

private void method()
{
button1.Enabled = false;

button1.BeginInvoke((Action)(() => button1.Enabled = true));

Action act = new Action(invokemethod);
button1.BeginInvoke(act);

button1.BeginInvoke((Action)invokemethod);
}

private void invokemethod()
{
button1.Enabled = false;
}


이 서브 스레드에서 윈폼의 컨트롤러에 접근시 위와 같이 사용

c# winform - acess controller in sub thread


btnScan => Main Thread

메인스레드가 아닌곳에서 접근할려면 이렇게 하면 된다.

btnScan.BeginInvoke((Action)(() => btnScan.Enabled = true));


예를 들어

Thread subthrad = new Thread();

subthread.Start();


이 서브 스레드에서 윈폼의 컨트롤러에 접근시 위와 같이 사용

2016년 7월 17일 일요일

c# timer 사용설명

타이머 생성자 2개를 보자.

1. Timer(TimerCallback)

-새로 만든 Timer 개체를 상태 개체로 사용하고 무한 기간 및 무한 만료 예정 시간을 지정하여 Timer 클래스의 새 인스턴스를 초기화합니다.

2. Timer(TimerCallback, Object, Int32, Int32)

-부호 있는 32비트 정수로 시간 간격을 지정하여 Timer 클래스의 새 인스턴스를 초기화합니다.


------------------ 타이머 생성법 -------------

1. Input 파라미터를 object로 갖는 메소드 생성. (타이머에의해 실행될 메소드)
2. 타이머 생성 이떄 메소드가 Input 파라미터를 사용하는 경우는 2번의 생성자 사용.

Timer(Input파마리터가 object인 메소드, 메소드에 들어가는 Input 파마리터, 시작전 딜레이, 인터벌)


------------------------------------------------


void timermethod(object state)
{
Console.WriteLine(state.ToString()); <- 여기서 100만 출력함. Timer의 두번째 Input 파라미터가 100 이므로..
string temp2 = stage.GetPosition();
}


private void button1_Click(object sender, EventArgs e)
{
System.Threading.Timer timear = new System.Threading.Timer(new TimerCallback(timermethod), 100, 0,100);
temp1 = stage.GetPosition();
for (int i = 0; i < 4; i++)
{
stage.MoveAbsPosXX(40000);
stage.GetPosition();
stage.MoveAbsPosXX(1000);
stage.GetPosition();
}
}


2016년 7월 14일 목요일

C# winform (윈폼)에서 크로스 스레드 관리. Invoke 사용법


1. 크로스 스레드가 나는걸 생각한다. (ex. 윈폼의 컨트롤들. 얘네는 윈폼 생성시 어떤 스레드가 다 처리한다. 이 스레드를 스레드1 이라고 한다.)

2. 크로스 스레드가 나는 애들. 즉 윈폼의 컨트롤에 접근해서 이용 할려고 할때, 이 일은 스레드1 에게 다 시켜야 한다.

3. 그 외의 것은 스레드 2,3,.. 이 처리해도 된다.


4. 밑의 코드를 보자.

a.버튼 클릭 -> 스레드tr이 Thread_Test1을 실행한다.
b.Thread_Test1을 실행시켜 나가는데 도중에 프로그래스바컨트롤에 접근을 해야되서, 이부분을 스레드1이 처리하게 명령한다. (invoke)
c. progressBar1.Invoke(pro1,new object[] { i}); 이부분이 스레드1이 pro1을 처리하라고 하는부분.
d. pro1은 델리게이트로 progvarCall pro1 = new progvarCall(Thread_Test2);에서 Thread_Test2 가 pro1이다.
e. invoke 는 입력파라미터가 델리게이트 이므로 이렇게 쓴것이다.
f. 그러면 Thread_Test1에서 인보크 부분만 스레드1이 처리하고 나머지는 tr스레드가 처리한다.

즉, tr스레드는 다른거 하고있다가, tr스레드가 호출(인보크) 할때만 Thread_Test2를 실행하고, 끝나면 다시 다른거 하러간다.


public partial class Form1 : Form
{

Thread tr;
public Form1()
{
InitializeComponent();
}

private void button1_Click(object sender, EventArgs e)
{
progressBar1.Minimum = 0;
progressBar1.Maximum = 1000000; //프로그래스의 최대값을 설정
tr = new Thread(Thread_Test1);
tr.Start();
}

delegate void progvarCall(int value);


public void Thread_Test1()
{
progvarCall pro1 = new progvarCall(Thread_Test2);

try
{
for (int i = 0; i < 1000000; i++) // for문을 이용해 프로그래스바의 값을 변경해 줍니다
{
//progressBar1.Invoke(new progvarCall(Thread_Test2),new object[] { i});
progressBar1.Invoke(pro1,new object[] { i}); // 크로스 쓰레드 발생부분만 따로 뺴준다.
//progressBar1.Invoke(pro1); < Invoke 형식 자체가 Invoke(Delegate method, params object[] args) 이다.
}
}
catch (Exception ex)
{
MessageBox.Show(ex.ToString());
}
}
// 두번째 스레드
public void Thread_Test2(int var)
{
progressBar1.Value = var;
}


}

2016년 7월 13일 수요일

C# 델리게이트 (delegate)


1. 델리게이트는 모양이다.
2. 델리게이트에서 정한 모양을 따르는 메소드를 등록할 수 있다.

ex>

1. 델리게이트 정의

delegate void GoodMan(int value);
-> GoodMan 이라는 델리게이트는 입력 파라미터를 int value 를 같는 모양이다.

2. 델리게이트의 인스턴스 생성 (GoodMan이라는 델리게이트, 즉 클래스 같은걸 1 에서 만든거다.)

GoodMan yoamn = new GoodMan(Method);

-> 이제는 yoman = Method 가 됬다. Method 를 호출할때 Method로 해도, yoman 으로 해도 된다.

3. 다른 메소드 등록

그다음에 yoman을 method2 로 바꾸고 싶을때

yoman = new GoodMan(method2);
yoman = method2

이 둘중 하나를 쓰면 이제 yoman 은 method2 가 된다.

c# 쓰레드 윈폼 (Thread winform)


먼저 쓰레드를 생성하고, Thread_Test1 을 시작한다.

그러면 크로스 스레드 예외가 난다.

윈폼에서는 컨트롤들에 접근할 수 있는 스레드는, 처음에 컨트롤들을 만든 스레드 하나뿐이다.

따라서,처음에 컨트롤을 만든 쓰레드가 있는데, 다른 쓰레드를 만들고 이쓰레드가 프로그래스바 에 접근할려고 해서 이 예외가 발생한 것이다.


--------------------------------------------------------------------------------------------------
Thread tr
public Form1()
{
InitializeComponent();
}

private void button1_Click(object sender, EventArgs e)
{
tr = new Thread(Thread_Test1);
tr.Start();


}

public void Thread_Test1()
{
try
{
progressBar1.Minimum = 0;
progressBar1.Maximum = 1000000; //프로그래스의 최대값을 설정
for (int i = 0; i < 1000000; i++) // for문을 이용해 프로그래스바의 값을 변경해 줍니다
{
progressBar1.Value = i;
}
}
catch (Exception ex)
{
MessageBox.Show(ex.ToString());
}
}

2016년 7월 3일 일요일

Keithley SMU2600 Series Control Program (제어 프로그램)


Keithley SMU2600 Series Control Program 입니다.

기본 측정과 공장 스크립트 구현해 놨습니다. 공장 스크립트는 Linear Sweep 만 구현해 놨습니다.

이번주 내로 트리거까지 작업해서 다시 올릴 계획입니다.


https://app.box.com/s/2pbyl3xn4hbbqbdg3bzbythhqxcc0rv9

2016년 6월 30일 목요일

CRLF에 대해


텍스트의 한행의 끝을 나타내는 코드이다.

종류로는 CR , LF , CRLF 가 있다.

CR : Carriage Return = \r

LF : Line Feed = \n

의 약자이고, OS 마다 다르다.


Window,Dos : CRLF = \r\n

Mac Os : CR = \r

OS X, Unix : LF = \n

** 아스키 코드로는 (16진수로)

CR = 0D

LF = 0A

2016년 6월 29일 수요일

Keithley .Net 프로그래밍을 위한 셋업


IVI Shared Component .NET 드라이버 설치

IVI Shared Component 드라이버 설치

Keithley IVI-COM Driver for Series 설치

장비 기초 : C# 으로 RS232 장비 컨트롤 하는법 [VISA 이용]


1. 장비가 VISA 를 지원하는지 NI 에서 확인

2. 레퍼런스로 NationalInstruments.Common , NationalInstruments.VisaNS 추가

3. using NationalInstruments.VisaNS;

4. MessageBasedSession mbSession =
(MessageBasedSession)ResourceManager.GetLocalManager().Open(ResourceName);

5. 리소스 이름은 다음으로 찾을 수 있다.


string[] sourcelist = ResourceManager.GetLocalManager().FindResources("?*");
foreach (string name in sourcelist)
{
lbxSourceList.Items.Add(name);
}


5. 이제 Quart, Write, Read 를 사용해본다 .

mbSession.Write(text);
string result = mbSession.Query(text);
string result = mbSession.ReadString();


6. Dispose

mbSession.Dispose();

2016년 6월 28일 화요일

Min Max 찾는 프로그램

매우 단순한 Min Max찾는 프로그램입니다.

엑셀에서 X Y 리스트 드래그후 클립보드에 복사,

프로그램의 로드버튼 누르면 알아서 XY 그래프 그려지고 , 찾고싶은 범위를 그래프에서 마우스 클릭으로 설정하면 자동으로 Min Max값이 표시됩니다.


나중에 시간되면 자동으로 로컬 최대 최소 값을 자동으로 찾을 수 있게 할겁니다.


https://app.box.com/s/wv80kxvwxjx5q89ricero7y2kgvvfo2q

실행은 Peakfind.exe로

2016년 5월 12일 목요일

CompositionTarget.Rendering 프레임이 바뀔떄마다 발생하는 이벤트

브라우저의 각각 프레임이 끝날 때마다 떨어지는 이벤트를 구현할 수 있는 방법이 소개되어서 올려봅니다.

(이게 WPF에는 있는 내용이라고 하더군요. Storyboard가 TimeLine 방식이었다면, 이건 Rendering 방식인가보네요..)

이 렌더링 이벤트 함수는 애니메이션이라던지, 레이아웃이 구성 트리(visual Tree)에 적용된 후에 호출이 되게 됩니다.

그리고 구성트리(visual Tree)가 강제로 업데이트될 때도 이 이벤트함수는 호출이 됩니다.

그래서, 임의로 렌더링 likely하게 구성하던 Dispatch Timer라던지, Storyboard Timer 대신에, 이 것을 사용하면. 모듈 메인루프

함수처럼 구현이 가능하다는 이야기입니다. (끝나지 않고 계속 실행되는..)

이 문법은 간단합니다.

CompositionTarget.Rendering += new EventHandler(MainGameLoop);

(주 : CompositionTarget 그대로 써주시면 됩니다.)

앞에서 작성해보았던 SnowFlake demo를 예로 들어보면, 메인루프를 Storyboard Timer를 사용했었습니다.


public partial class Page : UserControl
{
Storyboard _snowflakeTimer = new Storyboard();

public Page()
{
InitializeComponent();

_snowflakeTimer.Duration = TimeSpan.FromMilliseconds(0);
_snowflakeTimer.Completed += new EventHandler(SnowFlakeTimer);
_snowflakeTimer.Begin();
}

private void SnowFlakeTimer(object sender, EventArgs e)
{
MoveSnowFlakes();
CreateSnowFlakes();
}
}

이것을 그냥 이렇게 쓸 수 있다는 것이죠..

public partial class Page : UserControl
{
Storyboard _snowflakeTimer = new Storyboard();

public Page()
{
InitializeComponent();

CompositionTarget.Rendering += new EventHandler(SnowFlakeTimer);
}

private void SnowFlakeTimer(object sender, EventArgs e)
{
MoveSnowFlakes();
CreateSnowFlakes();
}
}

감사합니다.

-----------------------------------------------------------------------------------------------

코딩이 간편해지는 효과가 있군요.. 퍼포 상으로는 변화가 있는지는 잘 모르겠습니다.

WPF 로딩시간 대처방법

WPF를 사용하여 구현하고 있는 현재 프로젝트에서 한가지 문제가 생겼다.
개발 환경인 Windows Vista에서 테스트 할 때와 Windows XP에서 테스트 할때
로딩 시간이 엄청나게 차이가 난다는 것이다.

물론 간단한 UI를 가지고 있는 Application이라면 로딩시간이 차이가 별로 나지 않아 중요 하냐 싶지만,
현재 작업중인 프로젝트와 같이 규모가 큰 Application이라면 꼭 체크해봐야 할 문제다.

Vista에서 실행했을때는 1초 미만의 로딩 시간이 소요됬지만, XP에서는 짧게는 8초 길게는 20초까지 걸렸다.
아마 저사양 PC에서도 마찬가지의 성능을 보일것 같다.

프로그램을 실행 시켰을때 뭔가 실행되고 있다는 느낌이 나야 기다리든지 말든지 할텐데,
화면상에 아무런 반응이 없어 프로그램이 실행되고 있는건지 알 방법이 없다.
(나는 처음엔 하드 디스크 돌아가는 소리로 실행됫는가를 판단햇엇다 -_-ㅋ )

한국사람들의 특성상 3초만되도 반응이 없다면 왜 실행이 안되 하고 다시 실행을 하려는 사람이 대부분 일것이다.
나또한 그렇지만, 어쨋든 WindowsXP사용자를 고려 해야 하기 때문에 해결할 수 밖에 없는 상황.

먼저 원인을 찾아야 했다. 어.디.서. 이렇게 오래걸리는것인가???
몇번의 디버깅으로 원인은 쉽게 찾을수 있었는데,

XAML에서 작성한 Code를 C# Code에서 사용가능하도록 해주며
프로그램이 실행될때 XAML에서 생성한 객체들을 초기화 해주는 .g.cs 파일 의 InitializeComponent()가 원인이였다.

보통 UserControl이나 Window를 VS상에서생성하게되면 InitializeComponent()부분을
해당 Class의 생성자에서 호출하도록 자동으로 구현해 놓는다.

객체를 생성하면 화면에 아무것도 보이지 않는 상태에서 열심히 XAML에서 생성한 객체들을 열심히 초기화 하는것이다. 전체적인 안정성면에서 이방법이 좋을지 모르겟지만, 기다릴줄 모르는 사용자들을 위해서라도 로딩시간에는 뭐라도 보여줘야만 한다.

그렇다면 어떻게 해결하면 좋을까?

나는 이러한 문제를 해결하기 위하여 Loaded 이벤트를 추가하고, Loaded이벤트에
InitializeComponent()의 호출부분을 추가했다.

Loaded 이벤트는 객체의 핸들이 모두 생성되었을때 호출되는 건데 이때부터 컨트롤의 크기를 조절하거나,
이름을 바꾼다거나 하는 작업이 가능하다.

Loaded가 되면 아래와 같이 Visibility속성을 Visible로 변경해 화면에 보여지도록 변경하고,
타이틀을 로딩중이다라는 메세지로 변경했다. 그다음 InitializeComponent()가 호출을 했다.

void MainWindow_Loaded(object sender, RoutedEventArgs e)
{
this.Visibility = Visibility.Visible;
this.Title = "로딩중입니다요!!";
InitializeComponent();
}

이렇게하면, 내부적으로 Window를 생성하는데 최소한의 부분한 실행이 되기 로딩시간을 최소화 할 수 있으며,
사용자에게 로딩중이라는 메세지를 전달 할 수 있다.

나는 아래와 같이 MainWindow를 띄우기전 로딩창을 만들어 사용자에게 로드되고 있음을 더 명확하게 알려줄 수 있도록 구현했다.

void LoadingWindow_Loaded(object sender, RoutedEventArgs e)
{
InitializeComponent();
this.Visibility = Visibility.Visible;
MainWindow Main = new MainWindow();
Main.Show();
this.Close();
}

내용을 살펴보면 Load가 완료되었을때 이번엔 InitializeComponent();가 먼저 나와있다.
로딩중이라는 메세지를 XAML로 작성했는데. 이부분은 어쩔수 없이 로딩을 해야 하기때문이다.
(최소한의 Code를 사용하여 부하를 줄였다.)

마찬가지로 Visibility 속성을 Visible로 바꾸고, 본격적으로 보여줘야하는 MainWindow를 생성을 했고,
생성이 끝나면 MainWindow를 Show해줌으로서 로딩창을 닫았다.

MainWindow에서의 InitializeComponent()는 어느 위치에 놓여져도 상관은 없다.
로딩화면에서 미리 로딩중이라는 메세지를 미리 전달을 했기때문에!!

하고보면 되게 간단하지만, 개발자나 사용자 입장에서 볼때 로딩창은 꼭 필요한 요소라고 다시한번 느꼇다.
오피스나 포토샵을 실행할때 괜히 로딩창나와서 시간만 잡아먹네 하고 생각했었는데,
이러한 문제를 겪고 나보니 왜 필요한가를 절실히 깨닳을수 있는 기회엿던거 같다.

이렇게 간단하게 해결할 수 있는 부분을 귀찮다고 빼먹지 말자!

2016년 4월 11일 월요일

c# array [][] vs [,]

One is an array of arrays, and one is a 2d array. The former can be jagged, the latter is uniform.

That is, a double[][] can validly be:
double[][] x = new double[5][];

x[0] = new double[10];
x[1] = new double[5];
x[2] = new double[3];
x[3] = new double[100];
x[4] = new double[1];

Because each entry in the array is a reference to an array of double. With a jagged array, you can do an assignment to an array like you want in your second example:
x[0] = new double[13];

On the second item, because it is a uniform 2d array, you can't assign a 1d array to a row or column, because you must index both the row and column, which gets you down to a single double:
double[,] ServicePoint = new double[10,9];

ServicePoint[0]... // <-- meaningless, a 2d array can't use just one index.

UPDATE:

To clarify based on your question, the reason your #1 had a syntax error is because you had this:
double[][] ServicePoint = new double[10][9];

And you can't specify the second index at the time of construction. The key is that ServicePoint is not a 2d array, but an 1d array (of arrays) and thus since you are creating a 1d array (of arrays), you specify only one index:
double[][] ServicePoint = new double[10][];

Then, when you create each item in the array, each of those are also arrays, so then you can specify their dimensions (which can be different, hence the term jagged array):
ServicePoint[0] = new double[13];
ServicePoint[1] = new double[20];

Hope that helps!

Accord 를 이용한 엑셀 파일 import 하는 코드


public double[][] Inputs         ;
public int[]      Outputs           ;


public void ImportExcelData()
        {
            OpenFileDialog of = new OpenFileDialog();
            if (of.ShowDialog() == DialogResult.OK)
            {
                TDataTable = new ExcelReader(of.FileName).GetWorksheet("Classification - Yin Yang");
            }
            double[][] input  = TDataTable.ToArray("X", "Y"); // Column Header Name.
            int[]      output = TDataTable.Columns["G"].ToArray();

            ScatterplotBox.Show("TT", input, output).Hold();
            WriteData2Field(input, output);
        }

[C#] 파일 경로 불러오는법

경로는 다음과 같이 되어야 된다.
"C:\\Users\\SJW\\Desktop\\Local project\\알고리즘 예제\\Logistic\\LogisticClassification\\LogisticClassification\\data\\examples.xls"


string fileName = "examples.xls";


1번째 방법
string path = Path.Combine(Environment.CurrentDirectory, @"data\", fileName); // 여기선 디버그 폴더안의 example.xls를 가져올떄
           
2번째 방법
string path = new DirectoryInfo(Environment.CurrentDirectory).Parent.Parent.FullName; // bin 폴더 전,즉 프로젝트메인 폴더까지
string combinedpath = Path.Combine(path, "data", fileName);
TDataTable = new ExcelReader(combinedpath).GetWorksheet("Classification - Yin Yang");


3번째
using System.Windows.Forms; 을 사용해서 (레퍼런스에 추가 필수 )


if (of.ShowDialog() == DialogResult.OK)
            {
                TDataTable = new ExcelReader(of.FileName).GetWorksheet("Classification - Yin Yang");
            
            }


이렇게도 가능하다.

Accord Setting

Install Accrod From Nuget


Need


Accord
Accord.Io
Accord.MachineLearning
Accord.Statics
Accord.Control
Accord.Math

2016년 4월 7일 목요일

파이썬 행렬생성 numpy.linspace

numpy.linspace(start, stop, num=50, endpoint=True, retstep=False, dtype=None)


>>> np.linspace(2.0, 3.0, num=5)    
array([ 2. , 2.25, 2.5 , 2.75, 3. ])


>>> np.linspace(2.0, 3.0, num=5, endpoint=False)
    array([ 2. , 2.2, 2.4, 2.6, 2.8])


>>> np.linspace(2.0, 3.0, num=5, retstep=True)


    (array([ 2. , 2.25, 2.5 , 2.75, 3. ]), 0.25)


ex )
n = 100
    x = np.linspace(0, 2 * math.pi, n)
    y = np.sin(x) + 0.3 * np.random.randn(n)


x는 1 x 100 의 행렬 (n이 100 이므로)
y는 100의 포인트에 노이즈가 들어간 사인 그래프가 된다.


2016년 3월 28일 월요일

파이썬 os의 listdir

해당 경로에 존재하는 파일과 디렉터리들의 리스트를 반환합니다.


>>>listdir()
['DLLs', 'Doc', 'include', 'Lib', 'libs', 'LICENSE.txt', 'NEWS.txt', 'python.exe', 'pythonw.exe',
 'README.txt', 'tcl', 'Tools', 'w9xpopen.exe']

2016년 3월 25일 금요일

파이썬 리스트 인덱싱 기본

list = [ 10, 20 ,30, 40, 50 ]


list[1:3] = [20 , 30]  -> 인덱스 1 이상 3미만 -> 인덱스 1 , 2 반환


타입 보는법은 type(list)


list[-1] 은 리스트의 제일 뒤의 요소를 가져옴 ( 50 )

2016년 3월 24일 목요일

파이썬 KNN 알고리즘

from numpy import *
import operator
from os import listdir
def CreateDataSet():
    group = array([[1.0,1.1],[1.0,1.0],[0,0],[0,0.1]])
    labels = ['A' , 'A' ,'B' ,'B']
    return group, labels
def Classify(inX, dataSet, labels, k):
    dataSetSize        = dataSet.shape[0]
    diffMat            = tile(inX,(dataSetSize,1)) - dataSet  
    sqDiffMat          = diffMat ** 2
    sqDistances        = sqDiffMat.sum(axis  = 1)
    distance           = sqDistances ** 0.5
    sortedDistIndicies = sqDistances.argsort()
    classCount={}
    for i in range(k):
        voteIlabel = labels[sortedDistIndicies[i]]
        classCount[voteIlabel] = classCount.get(voteIlabel, 0) + 1
    sortedClassCount = sorted(classCount.items(),
                              key = operator.itemgetter(1), reverse = True)
    return sortedClassCount[0][0]

파이썬 dic타입의 sort 에 대한 예제와 설명

Classcount = {'A': 1, 'B': 2} // 딕셔너리 타입


sortedClassCount = sorted(classCount.items(), key = operator.itemgetter(1), reverse = True)


classCount.items() = dict_items([('B', 2), ('A', 1)]) 이다


key = operator.itemgetter(0) 는 dict_items([('B', 2), ('A', 1)]) 의 ('B' , 2 ) ('A', 1), 즉 행렬의 첫번째 부분의 인덱스 ( 0 ) 을 나타낸다.


key = operator.itemgetter(1) 는 dict_items([('B', 2), ('A', 1)]) 의 ('B' , 2 ) ('A', 1), 즉 행렬의 두번째 부분의 인덱스 ( 1 ) 을 나타낸다.


즉 다시 쓰면


sortedClassCount = sorted( [ ('A', 1) , ('B', 2) ] , key = 행렬의 인덱스1번 부분, reverse = True - 내림차순)


으로 정렬을 하게 된다.


그렇다면


sortedClassCount =  [('B', 2), ('A', 1)]  가 된다.


sortedClassCount[0][0] = B 가 된다.

파이썬 정렬을 위한 .iteritems() 설명과 정렬방법들

iteritems()는 '키'와 '값'의 쌍을 iterator(반복자)로 반환 ex) a = {} a['1'] = ('one') a['2'] = ('two') for i, j in a.iteritems(): print i pintt j -> 1 one 2 two ------------------------ 리스트를 소트하는 여러가지 방법 첫번째 방법은 리스트 클래스 내부에 있는 sort함수 사용하기. result.sort() print(result) 참 쉽다. sort함수가 어떤 알고리즘으로 동작하는지 알 필요가 없다 자동으로 정렬시켜 주기 때문에. 두번째 방법은 리스트 클래스 내부에 있는 sort함수를 사용하여 내림차순으로 정렬 result.sort(reverse=True) print(result) 마찬가지로 리스트 클래스 내부에 있는 sort 함수를 사용했다. 1번에서의 방법과 다른점은 키워드 파라미터를 이용하여 reverse 값을 True로 주었다는 것이다. 이 Reverse 라는 매개변수는 디폴트값으로 False를 가지고 있어서 별도로 입력하지 않았을때 오름차순으로 동작하게 된다. 세번째 방법. 외부 함수인 sorted함수 사용하기 other = sorted(result) print(other) cs sorted 함수는 파이썬 내부에서 지원하는 기본 함수이다. 지금 예제에서 사용하는 리스트 클래스는 내부에 sort라는 함수를 제공하지만 다음에 알아볼 tuple이나 dictionary는 sort라는 함수를 제공하지 않기때문에 해당 클래스를 정렬 시킬때는 이 sorted 클래스를 사용하여야 한다. 리턴값으로 정렬된 내용을 반환하니 저장하여 출력하는 예제가 되겠다. 네번째 방법. 마찬가지로 외부함수인 sorted함수를 사용하여 내림차순으로 정렬하기이다. other = sorted(result,reverse=True) print(other) 매개변수로는 위와같이 정렬할 내용(예제에서는 리스트)와 함께 reversed=True를 키워드 파라미터로 전달하고 반환값으로 정렬된 내용을 받는다. 다섯번째 방법은 키값을 만들어서 사용자 정의 정렬하기 이다. def lastDigit(n): return n%10 other = sorted(result, reverse=True, key = lastDigit) print(other) Colored by Color Scripter cs 위의 코드는 2자리 숫자를 가진 리스트에서 십의자리와는 무관하게 일의자리의 크기를 기준으로 정렬을 한다. def digitSum(n): return n/10 + n %10 other = sorted(result,reverse=True,key=digitSum) print(other) Colored by Color Scripter cs 같은 방법을 이용하여 1의 자리와 10의자리의 합으로 정렬을 하였다.

파이썬 기본함수 딕셔너리 get 함수

Description The method get() returns a value for the given key. If key is not available then returns default value None. Following is the syntax for get() method − dict.get(key, default=None) -Parameters- key -- This is the Key to be searched in the dictionary. default -- This is the Value to be returned in case key does not exist. -Return Value- This method return a value for the given key. If key is not available, then returns default value None. -Example- The following example shows the usage of get() method. intput // dict = {'Name': 'Zara', 'Age': 27} print "Value : %s" % dict.get('Age') print "Value : %s" % dict.get('Sex', "Never") output // Value : 27 Value : Never

파이썬 기본함수 정렬 argsort

There are two issues here; one is that np.argsort returns an array of the indices which would sort the original array, the second is that it doesn't modify the original array, just gives you another. This interactive session should help explain: In [59]: arr = [5,3,7,2,6,34,46,344,545,32,5,22] In [60]: np.argsort(arr) Out[60]: array([ 3, 1, 0, 10, 4, 2, 11, 9, 5, 6, 7, 8]) Above, the [3, 1, 0, ...] means that item 3 in your original list should come first (the 2), then item 2 should come (the 3), then the first (index is 0, item is 5) and so on. Note that arr is still unaffected: In [61]: arr Out[61]: [5, 3, 7, 2, 6, 34, 46, 344, 545, 32, 5, 22] You might not need this array of indices, and would find it easier to just use np.sort: In [62]: np.sort(arr) Out[62]: array([ 2, 3, 5, 5, 6, 7, 22, 32, 34, 46, 344, 545]) But this still leaves arr alone: In [68]: arr Out[68]: [5, 3, 7, 2, 6, 34, 46, 344, 545, 32, 5, 22] If you want to do it in place (modify the original), use: In [69]: arr.sort() In [70]: arr Out[70]: [2, 3, 5, 5, 6, 7, 22, 32, 34, 46, 344, 545] ------------------------------------------------------------- np.argsort doesn't sort the list in place, it returns a list full of indicies that you are able to use to sort the list. You must assign this returned list to a value: new_arr = np.argsort(arr) Then, to sort the list with such indices, you can do: np.array(arr)[new_arr] ------------------------------------------------------------- In [1]: import numpy as np In [2]: arr = [5,3,7,2,6,34,46,344,545,32,5,22] In [4]: print arr [5, 3, 7, 2, 6, 34, 46, 344, 545, 32, 5, 22] In [5]: arr.sort() In [7]: print arr [2, 3, 5, 5, 6, 7, 22, 32, 34, 46, 344, 545] ------------------------------------------------------------ x = numpy.array([1.48,1.41,0.0,0.1]) print x.argsort() >[2 3 1 0] 2 is the index of 0.0. •3 is the index of 0.1. •1 is the index of 1.41. •0 is the index of 1.48.

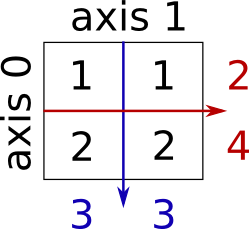
파이썬 기본함수 sum

Sum by rows and by columns:
>>> x = np.array([[1, 1], [2, 2]])
>>> x
array([[1, 1], [2, 2]])
>>> x.sum(axis=0) # columns (first dimension)
array([3, 3])
>>> x[:, 0].sum(), x[:, 1].sum()
(3, 3)
>>> x.sum(axis=1) # rows (second dimension)
array([2, 4])
>>> x[0, :].sum(), x[1, :].sum()
(2, 4)

파이썬 기본함수1

- 1 - datSet.shape[0] -> 데이터의 0차원의 길이를 반환한다. [EX] >>> a1=ones((1,2)) # 1x2크기의 값이 1인 배열 만들기 >>> a1.shape # 배열 크기를 출력해 주는 함수 (1,2) >>> a1.shape[0] 1 >>> a1.shape[1] 2 - 2 - tile(K,N) -> 데이터A를 N번 반복해 행렬로 만든다. [EX] import numpy as np A = 1 B = np.array([0, 1]) C = np.array([0, 1], [2, 3]) >>> np.tile(A, 3) array([1, 1, 1]) >>> np.tile(B, 3) array([0, 1, 0, 1, 0, 1]) >>> np.tile(C, 3) array([[0, 1, 0, 1, 0, 1], [2, 3, 2, 3, 2, 3]]) >>> np.tile(A, (2, 3)) array([[1, 1, 1], [1, 1, 1]]) >>> np.tile(B, (2, 3)) array([[0, 1, 0, 1, 0, 1], [0, 1, 0, 1, 0, 1]]) >>> np.tile(C, (2, 3)) array([[0, 1, 0, 1, 0, 1], [2, 3, 2, 3, 2, 3], [0, 1, 0, 1, 0, 1], [2, 3, 2, 3, 2, 3]]) >>> np.tile(B, (4,2,3)) array([[[0, 1, 0, 1, 0, 1], [0, 1, 0, 1, 0, 1]], [[0, 1, 0, 1, 0, 1], [0, 1, 0, 1, 0, 1]], [[0, 1, 0, 1, 0, 1], [0, 1, 0, 1, 0, 1]], [[0, 1, 0, 1, 0, 1], [0, 1, 0, 1, 0, 1]]])

2016년 3월 21일 월요일

파이썬 기본

print( " hellow %s  : %s " %(name , age) )


list = [ 1 , 2 , 3 , 4]


list[ 2 : 4] = [ 3 , 4 ]   < 리스트의 인덱스 2에서 3까지 표시


list.append(10)  -> list = [1,2,3,4,10] 이 된다.


del list [1] -> 인덱스 1인 2가 제거된다.


list + list


list * list


튜플 tuple = (0, 1, 2) ->안의 항목들을 지우거나 추가하는게 불가능


---------------- 흐름 제어 -----------------


 - if -
if age > 20:
   print("test")
   realage = 90
elif age == 30 or age == 32 and age < 35:
   print ("old")
else:
   print("young")


- for -   // list 안의 요소들이순서대로 x 로 들어간후 한번 루프 실행후 다음 요소가 x로 들어가서 다시 루프가 돌아간다.
for x in list:   
    print ("x")


for x in range(0,5):
   print ("x")


-while -  // 조건문이 false 되면 멈춤


step = 0
while step < 1000:
   print ("step")


while true:
   if step == 500:
      print("step")
   elif step == 700:
      break
   else
      step = step + 1


while x > 50 and y < 100:

2016년 3월 20일 일요일

ASP.NET 의 이해

동적 웹 페이지를 만들기위해선 웹 어플리케이션을 개발해야한다.


웹 어플리케이션의 개발에는


ASP , ASP.NET , JSP , PHP , Ruby 등이 있다.


웹 프로그래밍 개요

네트워크


서버 : 자료나 자원을 제공
클라이언트 : 자료나 자원을 요청


 웹 어플리케이션 : 웹을 기반으로 실행되는 프로그램. 웹 페이지를 통해 구현


-정적 웹 페이지-


웹은 자원의 위치를 표현하는 주소인 URL, 자원을 주고받기 위한 약속 HTTP, 자원을 표현하고 자원간의 이동을 쉽게 할 수 있도록 HTML 로 구성된다.


클라이언트는 웹브라우져


서버는 IIS,Apach,Tomcat,PHP를 설치해 제공


-동적 웹 페이지-


과정 : 주소를 입력해 요청 > 요청받은 웹 서버는 HTTP 에 따라 해석, URL 이 가르키는 동적 웹 페이지 호출 > 동적 웹 페이지의 코드(웹 어플리케이션)을 이용하여 여러가지 상황을 고려한 문서를 만든다.  (이때 필요한 자료는 대부분 데이터 베이스로부터 얻는다.) > 웹 어플리케이션이 만든 문서를 규약에따라 보내면 클라이언트는 규약에 따라 응답을 해석한 후, 해당 문서를 웹 브라우저에 전달한다. 웹브라우저는 받은 문서 (HTML)을 해석하여 내용을 화면에 나타낸다.